Minolta RD 175 - Retro Review
This year (2025), the RD-175 just celebrated its 30th birthday! For the bulk of the 1990s, digital components were clumsily bolted to film SLRs, and the RD-175 is perhaps the most obvious example of this. With old ports, batteries, memory, file formats, software, hardware and 3 decades of ageing electronics, it's a miracle that any of these franken-cameras still work today, but that's half the fun.

Minolta RD 175 + Konica Minolta 18-70mm
(Taken with the Sony A1 + Sigma DN 85mm f/1.4 Art)
Key Specifiations
Date:
$ (inflation):
Sensor:
Resolution:
Burst:
DR Stops:
Sync:
SS:
AF points:
Video:
Live-View:
ISO:
OVF:
LCD:
Memory:
Weight:
Battery:
1995
$9,999 ($21,000)
3xCCD (2x crop)
3x 0.38mp / 1.5mp
0.5fps
<6 (8bit)
1/90th
2s - 1/2,000th
1 (15%)
No
No
800
1.04x / 90%
None
PCMCIA type III
1,200g
300 (NP-500H)
History
The Minolta RD-175 was launched in 1995 in collaboration with Agfa, who called their version the "ActionCam" (1996). The market was small back then, Nikon & Fuji's collaboration used similar reduction optics, while Kodak's DCS 420/460 used larger and more expensive, conventional sensors. Prices were between $10-30k, with the reduction-optics competing for the low-end.
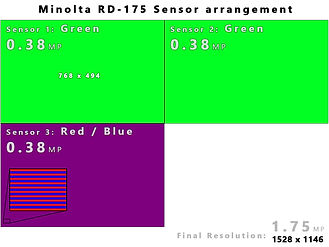
Sensor
As the front of the camera proudly states, the Minolta RD-175 has three separate CCD sensors. Each of which measure 6.4 x 4.8mm and capture 379,392 pixels (768 x 494). It falls short of capturing all three colours per-pixel at 0.38mp (blue and red sharing one of the sensors). The colours get the usual quad-interpolation (à la Bayer) up to 1.5 megapixels, and then interpolated again in the vertical axis up to 1.75mp (to correct for the non-square pixels). The reduction optics and tiny sensors cause a 2x crop, limit the minimum aperture to f/6.7 and the ISO to a single value (800). All this made this camera a real challenge to use.
Juxtapose | Tokina 19-35 | Raw Therapee
Hardware
The RD-175 was built on top of a low-end Minolta Dynax 500si Super film camera, which explains some of the most disappointing specs I have seen in a professional DSLR. The primary goal here was to keep costs down enough that they could challenge Kodak for the low end of the pro DSLR market. This also explains the small video sensors and experimental reduction optics, wrapped in a mostly plastic housing. None of the digital SLRs were elegant back then, but the bulk of the Minolta is especially awkward. The only positive thing I can say about its design is, it's so plasticy that it feels light for its size. Coming out before the internet was popular means original reviews are difficult to find. Despite some clever engineering, the practicality suffered compared to Kodak's options, making it a tough sell. I can almost hear the negative summaries across the 30-year void.
Software
The RD-175 can only shoot images in raw (.MDC) format, which was the way until the Nikon D1 (1999). Back in the day these raws could have been imported into photoshop with a Twain driver (via the Minolta software). That is not a practical solution on today's hardware. These files do not open in any of the main image editors natively today (Mac or PC). All of my experiences were on the Windows platform, so if you'd like some Apple perspective, I recommend Ralf Jannke's articles; here and here.
-
RAW Therapee can "technically" open the files. You just need to add it (.mdc) manually in the settings. The exposure bug in the latest version (5.11), the fiddly menus and incredibly poor image quality (see above) lead me to not recommend that you touch this option with a barge pole, so fortunately there are a couple more options...
-
The free edition of PicaJet cannot edit the Minolta raw images directly, but it can export them into something more friendly (JPEG, BMP, GIF, TIFF, PNG, TGA). After batch converting the raws to TIF, I used Photoshop to correct the ratio and then Adobe Camera RAW to process the images. The images had some colour-fringing issues, but not as much as Raw Therapee.
-
The official Konica Minolta website, astonishingly, still has the original software available to download. The executable still works on Windows 11, just as it did on Windows 95. The file converter (simply called "RD-175") lets you batch convert the raws (TIFF, BMP, JPG). It also provides two levels of sharpening and a "Chromatic Filter" option. Although the sharpening is better done in post-processing, the Chromatic Filter did wonders!
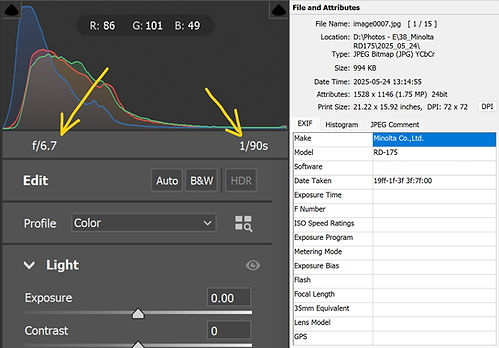
EXIF: ACR vs FastStone
Exif
The Minolta raw files have a very limited support of EXIF data. The TIF files, exported from the official software, show the camera name in FastStone's EXIF info. If you bring that file into Adobe Camera Raw (ACR) it shows the aperture and shutter speed. Although that info is only here and not saved out to the JPG EXIF. Exporting from PicaJet shows no information at any stage. I haven't yet had a chance to see how well this works with an older computer in Photoshop 4.0, but I'm not going to hold my breath for that...
Ratio
As mentioned briefly in the sensor section above, the RD-175 uses a non-square pixel matrix that needs a little stretching in the vertical axis to display correctly. The official software does this during conversion, but other software does not, and so you will have to do that step manually to get normal looking images. Below is a before and after example of this process...

Aprilla | Konica Minolta 18-70 | Pixel Ratio
Processing
The first three examples below show the direct output from each of the three supporting Windows software (no exposure or colour adjustments, no noise reduction or sharpening). The last image shows a processed image, that was exported from PicaJet.

Ducklings | Tokina 19-35 | Software Comparison
Image Quality
Despite the web samples fully illustrating just how pre-millennium the quality is, I do have a few notes. Raw files might be awkward (see above), but at 1MB each, they are at least small. Converting them to TIF will make them a much healthier 5MB, eating through precious HDD space on a typical 800MB hard-drive from 1995. The triple CCD sensors were a smart way to cut costs, but they had some limitations that seem unusual today. For example; they only provide a unique colour per pixel at a woeful low 0.19 megapixels. This means that strong blue or red colours fall apart during sharpening (see Aprilla bike above). I could not find any data about the dynamic range that the sensor captured, but if it should be less than 6 stops, comparing it to images from later cameras, like the Nikon D1 which has 6.5 stops. That sounds pretty terrible, but I expected it to look much worse than it does.
Noise
I could push exposure a little in post without adding too much noise. Again, I was expecting much worse, given the camera's age. I did notice some green noise on the left edge of some images (see below), but it depends on how far I push the images and what colours and lighting is on that part of the sensor. The low resolution, tiny sensors, beam splitter, colour alignment and lack of raw editor support compound each other to reduce the image quality, so it's a miracle that things look as good as they do. I was going to liken the quality to an early mobile phone camera, but that would be unfair as they were littered with compression artefacts and that's one element that you don't get here.
None of these images are using any upscaling, sharpening or denoising. Although I detest most AI in principle, I am a fan of DxO's PureRaw software as it's not the annoying kind of AI. DxO restores detail in a faithful way, rather than fantastically making up patterns (like Adobe or Topaz's offerings). Unfortunately, DxO "only" supports camera's back to around 2002, so this camera is way too old for that anyway. What you see here is conventional processing, either done in Photoshop 4.0, or Adobe Camera Raw (ACR).
WB
The auto white balance worked OK for the most part, but did give a few crazy results that I could not fix in editing, so I set it to sunny from then on. Dedicated white balance sensors were common from this point until the early 2000s. You can spot this one at the back of the camera, to the right of the flash. They made a lot of sense on paper, but were not that reliable and so disappeared around 2003. These are making a comeback in modern smartphones. It will be interesting to see if they stick around there and perhaps eventually make their way back to future cameras again.
Apertures
Like Nikon's E2 Digital camera, the RD 175 used reduction optics to refocus the light on to a much smaller sensor (or sensors in this case), but where the Nikon did that from a full (35mm) frame, the Minolta suffers a heavy 2x crop. Both systems suffer the same f/6.7 aperture limit, but in the Minolta's case the two factors multiply for shallow depth of field (subject isolation). This makes the one aspect that could distract from poor image quality completely inaccessible. Do you have a nice quality, fast lens in this mount? Well, tough because it won't make a drop of difference. Your 85mm f/1.4 becomes a 170mm f/13.4 here, yuk!

Bike Sunset | Sony DT 50 | RD-175 converter
Viewfinder
This camera's optical viewfinder is possibly the worst I have ever seen. It is distant, dark, full of aberrations and hazy (although that last one is probably related to age). If you don't place your eye just right, it will look out of focus from extreme colour fringing. Most of the nastiness is caused by the beam-splitter, and the rest is due to the low-end camera. There is no diopter adjustment here. Possibly the most irksome aspect is not being able to see any camera settings in the viewfinder. It would be really nice to see if your shutter speed is too high or low when you're shooting, but for that you will have to look at the top LCD.
Screen
Having no rear screen really ages this camera. This means no reviewing images, no changing settings, and no deleting images. That last one can really catch you off guard if you fill up your only memory card. You'll need to connect the memory to a computer to delete the images you don't want, and remember you won't have thumbnails, so you'll probably have to delete them all. If you want to change any of the digital settings (including the date), or format the memory card, it requires connecting the camera to a computer via the SCSI-2 cable. This is extremely difficult today, unless you have (or buy) an old Mac, or Windows 95/98 machine with the correct SCSI-2 card, cable and drivers. If that doesn't sound insane, I am not explaining it well.
Settings
Despite the exposure being pretty reliable, the max shutter speed is rather troublesome due to being stuck at iso 800. You might think that shooting in low light was not too bad, but then you remember you're also limited to a minimum aperture of f/6.7. In good light, you'll need to use at least f/11 to get around the slow max shutter speed. Plus, you'll need to shoot away from the sun to get any colour in the sky. Remember that f/11 is actually f/22 on your doubled focal length. The slow shutter sync speed makes flash problematic and even makes motion a potential issue.
Focusing
With only one single focus point, which feels like it takes up a third of your view, there is no easy way of telling what the RD-175 is actually focusing on. This is made much worse by the poor viewfinder, thus your ability to see what's in focus is greatly diminished. The camera's inability to capture any shallow depth of field is somewhat of a bonus in this regard, just not a particularly fun one.
If you're using Photoshop and miss shallow depth of field, you could try using the "Len Blur" tool in ACR to make a depth map, which can then fake depth blur in post. It doesn't work well often and when it does, it will still require some clean-up, but it's there as an option and can provide some fun extreme results too. Here's one of my better examples...
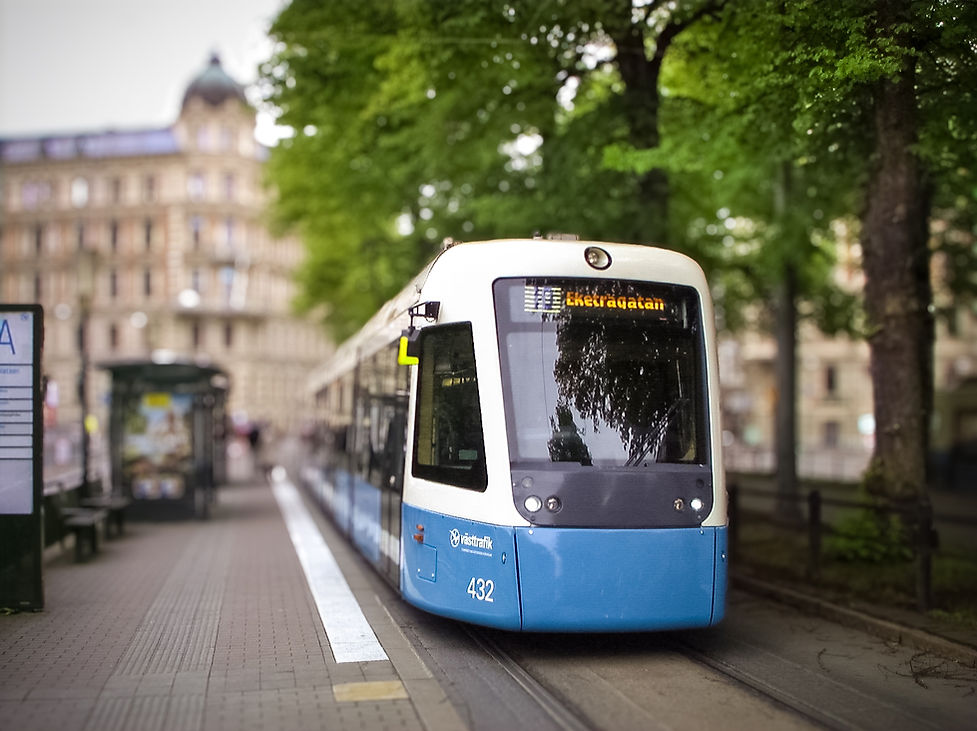
Tram Depth | Konica Minolta 18-70 | RD-175 converter
Lenses
Lens speed makes no difference here at all and even lens quality is barely noticeable. I recommend just choosing your lens for this camera on its zoom range, as long as it focuses. I will get to my favourite lens for the Minolta last, but first, here are some others...
The Minolta 35-70mm lens (see below) is a really neat little lens and looks good on the camera. It focused well, but its effective 70-140mm FoV is not very friendly, and the image quality is rather poor.
The Sony A-mount 50mm f/1.4 focused pretty well, but turning into a 100mm f/13.4 equivalent just feels like a massive waste to use such a lens on a system like this. You might as well just use a zoom, and so I did.
The Tokina 19-35mm was a useful range and had better image quality than the Minolta 35-70, but the cheapness reared its ugly head during focusing. When it wasn't hunting, it was constantly grinding against infinity, like it wanted to go further. The focus indicator showed red in the viewfinder when half-pressing the shutter button, only showing green when releasing. Maybe it focused ok, but it didn't fill me with confidence.
The two Sony DT lenses (50mm f/1.8 and an 18-55mm kit lens) would not focus on the RD-175 due to not having screw-driven autofocus. You don't get this issue using Nikkor AF-S lenses on an older Nikon AF body, so it threw me for a while. It also confused me when the zoom lenses' AF locked up when attached to the camera. Since it isn't supported, I would have expected the focus to move freely, but it was like it was supporting locking it up. Once I switched the lens to MF, I could focus manually. Focusing manually on this awful viewfinder would be impossible, so at least the fous indicators in the v
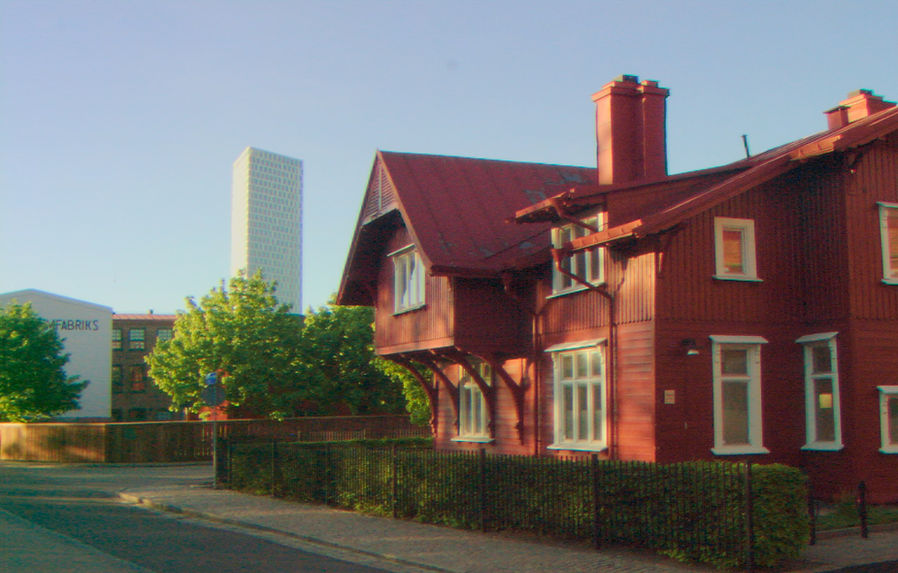
Perhaps the best lens experience that I had on the Minolta RD-175 was the Konica Minolta 18-70mm lens. This is new enough (2006) to be made for smaller sensors and thus has a wide-ish angle (36-140mm here), but it's old enough that it still uses the screw driven AF system. The lens is a bit bulky on the RD-175 (see first image, above). It does have a bit of barrel distortion at 18mm, but it focuses well, the sharpness was good, and the range is nicely versatile.

Mural | Konica Minolta 18-70 | RD-175 converter
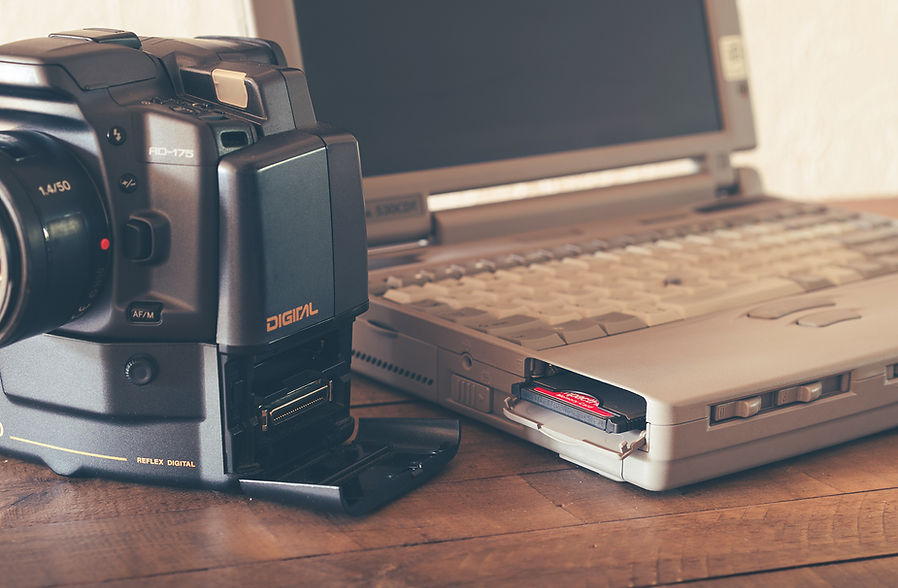
Memory
Back in 1995, the RD-175 used 131MB Maxtor PCMCIA drives (spinning disk). These are rare to see today and tricky to get images off, if you don't have a PCMCIA reader, anyway. The better option with modern computers is to use a PCMCIA to Compact Flash adapter (or to SD cards). Since there is no screen or buttons for the digital parts of the camera, memory originally needed to be formatted inside the camera while it was connected to a computer. This would require a PC with an older operating system, the correct SCSI card, cable and drivers. Without this, the camera will not function. That's the bad news. The good news is there's now a better way...
Fortunately, some kind people have made a disk image of the formatted card and shared it online. There are posts describing how to do this, although links to the disk images have been broken for many years. I initially managed to get help from 'Ralf Jannke' (of the digicammuseum.de), who kindly gave me a pre-formatted CF card, which has about 40MB of space. More recently, 'BigRobotBil' (on Reddit) found me a link to a 256MB image that you can burn to a larger card. This is the most storage you can have. Any more than that and the camera will not accept it. I used a program called "win32diskimager" to copy that image to a card, and can now shoot 198 images on each card. Thanks again, guys! To complete my nostalgia trip, I found a 256MB Agfa CF card, which (because of the Agfa ActioCam) helps me remember not to reformat it for something else.
I will talk more about this 1997 Toshiba laptop at the end of the review. It is demonstrating how convenient PCMCIA slots were for transferring images directly from professional cameras of the time. No dongles! We should be so lucky today...
PCMCIA | Image Transfer, 90s Style
Batteries
My RD-175 came with two original Minolta NP-500H batteries that amazingly still hold a pretty good charge. These power the camera's digital components, like the sensor and writing to the card. The original charger also came with a cable to power the camera directly from the mains. It's nice to have, but I probably won't use that. Unfortunately, each part of the camera requires a different battery type. A 2CR5 powers the film camera elements, like focusing and shutter (just like on the original). Then, finally, a C2025 (watch) battery powers the clock. Although that last one is mostly pointless (especially if you can't connect it to a PC) at least you can actually replace it, unlike the Nikon D1 or Kodak DCS 560/760.
Surprisingly, the main rechargeable batteries use Lithium-ion, which most other manufacturers would not use until many years later. Not only did this allow the batteries to be significantly smaller, but they are much more reliably left uncharged. These original Minolta batteries not only still charge, but they still work and hold a decent charge after 30 years! This makes them much more friendly than the Ni-CAD and Ni-MH batteries that Kodak, Nikon and Canon used, several years later. If you need new batteries, 'ffrolvaag', at the Dyxum forum has found that you can use a few different Sony batteries as replacements (NP-F330, NP-530, NP-550). If you need a new charger, it should be equally easy to track down, it just won't be able to power the camera directly from the mains.

Old Police | Tokina 19-35 | RD-175 converter
Speed
The startup time is less than a second, which is a lot quicker than my first mirrorless camera, from 2014. Actually, it might even be quicker than my professional Sony A9 (2017). Where it doesn't fare as well is burst speed. At 0.5fps, or one frame every two seconds, it's 40 times slower than the A9, or even low-end mirrorless camera today. This was never an action camera (no matter what Agfa wanted to call it). Autofocus is not exactly fast or accurate, but it's not terribly slow either, as long as it uses the screw driven focus system.
Competition
Nikon launched their reduction optics cameras, the E2/E2S in collaboration with Fujifilm, who called their models the DS-505/DS515. This was a 1.3 megapixel 2/3" sensor that shared the f/6.7 minimum aperture limitation, but had two ISO values to choose from (880 & 1600), a higher 1fps burst, and could capture the entire full frame 35mm field of view. Nikon also launched their base, E2 camera for $10,000 and thus was a more enticing option for pros than the Minolta. A 50mm f/1.4 would be equivalent to a 50mm f/6.7 here.
Red Squirrel | Konica Minolta 18-70 | RD-175 converter

The Kodak DCS 420 came out a year before the Minolta (1994), at a slightly higher price ($12,000). Its resolution was similar (1.2 megapixels) and it used a much more traditional sensor type, even if it was a rather small one. The Kodak's 2.6x crop was rather awkward, but at least you could use your lenses real minimum aperture. This made a 50mm f/1.4 lens an equivalent 130mm f/3.64. Yeah, OK, that's not great, but it was a lot better than it becoming a 100mm f/13.4 on the Minolta! The Kodak's colours were infamously magenta tinted due to a weak internal IR filter, but Kodak still had the objectively better IQ option for the time.
Image quality wise, the king of cameras around this time was the Kodak DCS 460 (1994). Just like the DCS 560, it had an APS-H (1.3x crop) 6 megapixel sensor. At $28,000, it was the most expensive model back then ($60,000 adjusted for inflation), but is no more expensive than the DCS 420 model today. It still suffers from the strong magenta colours, but if you can find a working example today, it'll be the best example of image clarity from this period. A 50mm f/1.4 lens here will act like a 65mm f/1.82, which is not too bad.
Today
Being 30-years-old, the RD-175 is one of the oldest digital SLRs around that is relatively easy to get working. The Nikon E2 and similar models from Fuji are very difficult to find, expensive and rarely work. Ebay listings for these Minolta and Agfa models are not uncommon. They vary a lot on price, but I wouldn't call any of them "cheap" and that's a big problem when none guarantee functionality. Many describe them as "The world's 1st Digital camera", which is wildly inaccurate. None include a functional memory card, which will be the biggest problem. Not including functional batteries and chargers is less of an issue on this model since there are plenty of replacements, but that still means the cameras are not function tested. If you do want to pick one of these up, at least make sure it comes with the battery caddy, otherwise it'll be really awkward to use.

Mengfan | Konica Minolta 18-70 | RD-175 converter
Final Thoughts
There is no denying that the RD-175 is a challenging camera to use, but I have had a blast working around its limitations. Working in the blind, thinking about every step and making educated guesses, can be a healthy & fun discipline. Once you learn the camera, there's not much you can actually do with the settings, and that is somewhat freeing. It almost reminds me of shooting film, but that's kind of sacrilegious considering it was engineered to supplant it. Not having to buy film, find and pay for developing, processing, printing and mailing photos must have been a revelation for professional photographers back in 1995.
Being only four years into the digital SLR story, and four years earlier than they became mainstream, cameras like the RD-175 are a fascinating piece of the pro digital puzzle. It may not be a pretty camera, or comfortable to use, or produce amazing images, but using it transports you back to a time of exploration and technological transition. This window into the past contextualizes modern technology in a very interesting way. Perhaps people could benefit from this experience occasionally, to be reminded of how far the technology has come and to appreciate the quality and convenience that we have.
Images from Picajet come out very soft and low contrast, but both of those elements often clean up better in post. The Minolta software provides less colour fringing, better tonal range, a corrected ratio and some EXIF data. It also converted images about three times faster than Picajet, despite the extra processing (not that it's terrible on any modern PC anyway). It depends on the image as to which one wins in overall image quality. That makes it very difficult for me to make a recommendation. For an easier workflow, go for the official RD-175 converter. If you want to improve image quality, try investing some time experimenting with the PicaJet files.
I am also glad that some of Minolta's expertise and innovation continued on to Sony, to make them what they are today.

#1 | Konica Minolta 18-70 | RD-175 converter
Resources
Here are some useful links if you own (or are thinking about owning) a Minolta RD-175:
-
Official camera page (still downloadable software)
-
Memory cards (broken links, but see below)
-
256MB Card Image: Direct link + My OneDrive
-
Dyxum Forum (batteries, original marketing and more)
-
The first digital SLR to be used in stop frame animation, for Dreamworks: "The Neverhood" (1996)

Other Reviews
Most searches for the Minolta RD-175 bring up spec lists, but real reviews are few and far between. John Henshall's review is taken from "The Photographer" magazine published in May 1996, but apart from that it's difficult to find official original reviews from when the camera was new due to the internet being pretty new. I did find a mention in Popular Photography's December 1995 issue (above), in a section about the best digital cameras. The other links are reviews from people who got hold of the camera much later on (like myself)...
-
John Henshall (1996)
-
Viktor's blog + video (2020)
-
Analog Dan's Video (2021)

Bonus Photos
I enjoyed taking photos with the Minolta RD-175 way more than I thought I would. Here are some more photos I took that didn't quite make it into the main review...


Old Laptop - Digital Editing
Editing digital photography on a laptop would have looked something like this (below left) in the mid 90s. Surprisingly, this not vastly different in size to today (below right), even if the speed, value, weight, longevity and capability have been improved dramatically. The sticker price for the old combo (laptop + camera) would have been around $30,000 (adjusted for inflation). Although the street prices likely would have been quite a bit lower, it still would mostly have been for professionals.

For anyone that is equally interested in the Toshiba laptop, I will make a page showing everything I have done to get the laptop working soon. I will also try to make some videos showcasing...
-
Around the laptop (Ports, screen, CD, FDD, RAM, main battery)
-
How to add RAM
-
How to remove the keyboard
-
How to remove the CMOS & Suspend batteries (full disassembly)
-
How to install a compact flash card as an HDD (hard disk)
-
How to install Windows 95 (without a floppy, CD-ROM, or USB)
-
How to install Photoshop (& other imaging software)
-
How to Transfer & Edit images from the Minolta
-
How to Format a memory card for the Minolta
-
Unboxing - MS Wheel Mouse (I'd also love to find a Wacom Art Pad)
Unfortunately, I will not be able to use this laptop to connect to the camera (formatting and setting the date) because it doesn't have a SCSI port. Its large dock does, but that is very rare, and it still may not be compatible. If I manage to get a PCMCIA SCSI card for this machine, or an old desktop PC with SCSI card, and it connects to the camera, then I will add another video to this list. For now, I will show the card formatting the easy way - simply imaging an existing card via a new PC.
Software
Photoshop 4's adjustment layers were a huge improvement to photo editing in late 1997. It's no Adobe Camera Raw, but these tools are still used in advanced Photoshop workflows today.
Hardware
Although I bought the old laptop to go with this old camera, I decided on a slightly later 1997 model due to its availability and condition. Just like the camera, it was not easy to get working properly now. With no functional floppy drive, reinstalling the original Windows 95 was somewhat tricky. The original 2.1GB spinning disk still worked, but the sound it made was driving me insane, so I switched it out for a compact flash (CF) card. The 32GB SanDisk Extreme Pro (160MB/s) CF maxed out not only the IDE transfer speeds (133MB/s), but Window's allow storage for fat32. It may not be era appropriate, but it was a lot more pleasant to use.
The old TFT screen is rather dull (especially on battery), suffers from terrible backlight bleed and the viewing angles are atrocious. Am I spoiled by the new laptop here? Sure, but the TFT may have degraded, and it's unlikely that OLED will look good after 28 years either.
The battery of the old laptop managed nearly 1.5 hours of use when editing images in Photoshop, and that's with the spinning disk (haven't tried the CF yet). This is pretty amazing considering how old the battery is! That's nearly the same battery life that I get from the 18-month-old Acer Swift 16. Battery life was one of the main factors driving my purchase of the new Lenovo laptop. Well, that and the keyboard, processor, convertible screen and pen.
Wacom tablets were around in this period too, which would have made painting masks a lot easier than using the track point on the laptop, or an additional ball mouse! When I chose the new laptop, I made sure that it had an active stylus, so painting can now be done directly on the screen. We would have killed for much of this tech back in the 90s!
Old vs New
Comparing the power of old vs new tech can be fascinating and fun. 28 years of laptop progress has given us extreme multitasking, with at least eight processors (around 200x the power), a thousand times as much RAM (140x faster), and five hundred times more storage (nearly 2000x faster). All of that lasts around ten times longer on a charge, for half the weight and a fraction of the size / price. To anyone who feels disillusioned by the stagnation of modern technological progression, I highly recommend playing with an old machine like this for a while. Specs are not everything either, tell me Windows 95 was better after getting 30 BSODs (blue-screens-of-death) trying to install a USB driver. Then having to run a disk scan for 20 minutes each time, after it finally reboots.
Two Steps Back
Camera memory today is much higher capacity, smaller, significantly faster and with redundant backup, but no laptop has a CF-Express type A card reader built in. Old cameras and laptops used PCMCIA, thus no dongles were required. Unlike USB, camera memory has never been standardized well. The best you can hope for is an SD card slot (usually micro), but that's not too helpful for professionals. Being a Sony user, I am biased, but... CF-E type A is the better option here. It's small enough that cameras can fit two of them, for redundancy. If all cameras switched to this, laptops might actually adopt it too. We need a solid alternative to the terribly slow and unreliable micro-SD! The big problem with CF-E type A right now is their price. Cheap cameras can't justify them. If that changed, maybe we could get a better solution. Carrying around a card reader for your photo transfers is annoying AF!
Progress
Going back to the camera - Shallow depth of field was not easily possible back in the mid 90s (although the bigger and more expensive Kodak sensors would have been reasonably capable, from $56,000). However, today you can have a highly capable setup on a much lower budget, and while keeping the weight down. You can get a laptop, camera and fast portrait lens for around 2KG (4.4lbs). Either with a full frame setup (from around $5,000), or APS-C (from around $2,000). People would have killed for that back in the 90s!